I was able to disassemble the instrument today.
I started with the two-piece mouthpipe. Here was the connecting ferrule -- notice the gaps.


It actually didn't join up too badly inside the ferrule, but I definitely want a one-piece mouthpipe for the future. With some persuading, I got it off. It looks like this tuba was reassembled in its current state using rosin-core solder, which has left a bit of a sticky mess on solder areas that I worked to clean up.
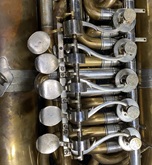
Next came the valves:

No big surprises here, but the fourth valve (King sousaphone) circuit was mostly made of soldered-in-place slide tubing with the slides still attached, so it was easy to remove. I am going to hang on to the fourth valve tubing as it's the same bore I would like the rest of the horn to be -- King .687". Here it is more disassembled:

I next attempted to remove the fourth piston from the 3-valve cluster that it was added to. My reasoning was that, if I am going to make this entire instrument the same .687" bore, it might be nice as a rank amateur to have a spare piston on hand if things go awry. Notice the nifty homemade braces that kept it attached:

Here is a pic where you can see the gap in bore between the 3 valve cluster and the sousa valve after I removed some epoxy:

I removed the tubing circuit and then tackled the joint connecting the 3-valve cluster to the sousa piston. This was tricker (and nastier) as I had to deal with that epoxy. It mostly burned off, and what didn't burn off I was able to peel/pick off using a set of these nifty little picks I got at Harbor Freight for $1 the other week:

Eventually, it yielded and I was left with one sort of gross-looking King sousaphone piston:


Notice the chunk missing out of one of the ports. Is that normal? That joint is where most of the epoxy was.
After removing that, I was left with a three-valve piston block in F. Anybody need a .650" bore three valve section in F?

At the end of this venture, I was left with a good deal of King braces and spare parts that I will hang on to:

I also managed to save most of the spots of solder that came out and landed on my workbench, especially after cleaning up some of the blobby solder spots on the main bugle.

I took this pic mid clean-up on the main bugle, but you can see what I am dealing with. I am going to turn that inner bow around so it's in a more conventional layout and continue to clean up the solder/rosin blobs.

Next up, I'd sort of like to clean the bugle now that it's really accessible after disassembly (and since I don't have a lead on a four-piston set or mouthpipe yet). Then, this project will be on hold until those parts are acquired, and then it will get way harder! Taking stuff apart is easy -- let's see how putting stuff together goes.
Thanks for reading!